InterService Communication using gRPC

Introduction:
REST, GraphQL, and gRPC are the most popular web API development technologies and all of them have different capabilities and features.
In this article, I will talk more about gRPC as an option. Here and here you can find articles that contain a will-clarified comparison between them.
Comparing the different technologies:

About the gRPC:
In 2016 in the Google labs, they were working on something to be used to communicate between the services and they wanted something faster to be used to support the communication among a numerous number of internal services that they have so they created something called Stubby, it was built specially to be used for Google and it has some limitations, but after that, they decided to build something more generic to be used globally so the found the gRPC.
The main characteristics of gRPC:
· Communication is done using binary data and it means no JSON or XML (you can use extensions to add a layer to transform the data in the format you want).
· It uses a predefined communication structure so it is a contact base communication like WCF so you know exactly what you are going to call.
· It is supported by different development languages so you can use different languages to communicate with each other’s, and the common link between them is the same as the contracts of WCF and it calls protocol buffer (ProtoBuf).
· It is using HTTPS to communicate so it is considered to be secured
· There are different ways of communications style like Uni and Bidirectional streaming which allow the client and the server to keep communicating and send data compared to the one request and response that uses in REST communication.
The performance comparison:
HTTP/1.1 vs HTTP/2:
As I mentioned before gRPC is using http/2 which is considered to be much faster than the older versions taking into consideration that not all browsers support it. Yet there is an extension to make it usable with HTTP/1 but at first, it is built for HTTP/2. There is a website that shows the difference:

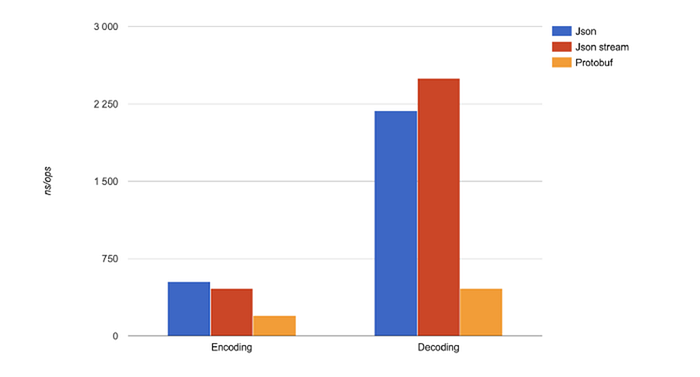
Json vs protobuf performance:
Here we can see how the protobuf is beating Json in both serialization and deserialization operations, it is not a human-readable language so using it in a public API may not be always the correct solution but for example, using it in online gaming solutions that need fast streaming could be a good point, so in some cases, we have to accept it so we can gain the performance and decrease the load on the network and the needed resources
Implementing GRPC in .net core6 :
In this example, using Visual Studio 2022 we will create a Client-Server example of a customer service that gets the customer data and handle it internally like for example saving it to the database “I will not implement this part because it is out of the article scope”, and the client that will send the data to the service and get response according to it. After that, we will create a docker image for the service and then deploy it to Kubernetes.
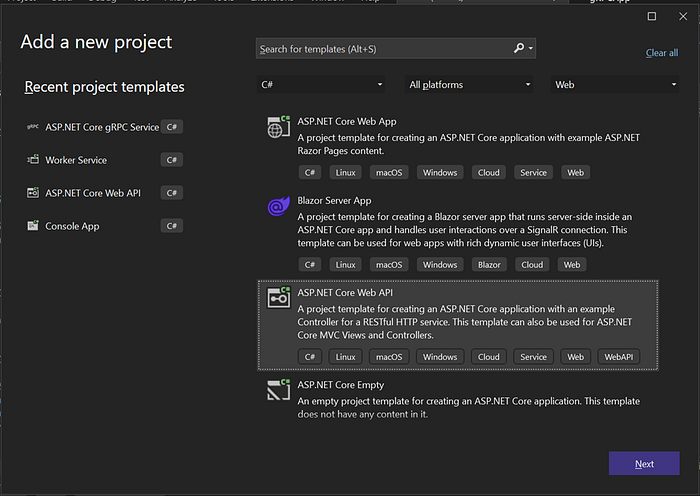
First of all, you have to create a new solution and inside this solution, you have to create a new project with the type ASP.Net Core Web API and the .net core 6 version:
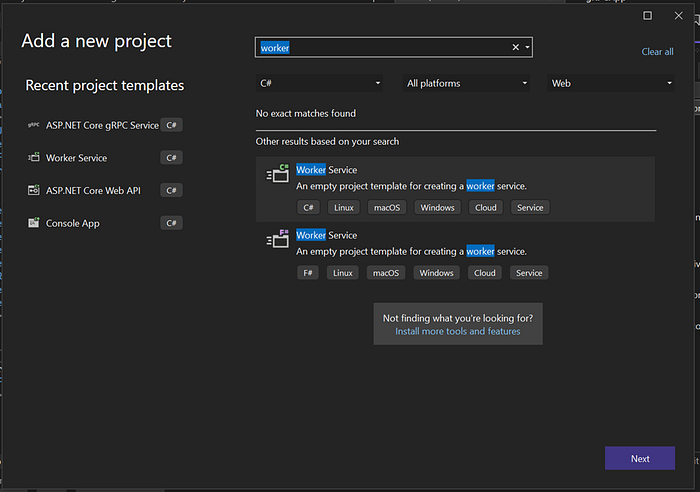
After that, we will add another project to the solution this one is for the client side and the type of the project is Worker Service also with .net version 6. Like below
And finally, we will create a shared folder that will contain the proto file for the gRPC communication also the yml file for the deployment of the service to Kubernetes.
Step1(Create the Protobuf file):
Inside the shared files folder will add a new file with the extension proto and inside the file we will add the following code:
syntax = "proto3";

option csharp_namespace="CustomerService.gRPC";


service CustomerService
{
 rpc  AddCustomer (CustomerPacket) returns (StatusResponse);
}

message StatusResponse
{
 ReadStatus Status=1;
 string Message=2;

}

message CustomerPacket
{
 repeated CustomerMessage CustomerMsg=1;
}

message CustomerMessage
{
 int32 Id=1;
 string Name=2;
 string Address=4;
 reserved 3;  // this opetion is used when we want to change the message and we remove a property.
    // in this case to keep the compitabiliy we keep the removed order so that no one willl use it and if sended this will not cause a problem
}


enum ReadStatus
{
 Success=0; // should be started form 0
 Failer=1;
}
As you can see, first we define the version of the proto that we use. Then the namespace of the service that we are going to create, then we start writing the content of the file
· The service that we will create should start with the service keyword
· The function that we will use should start with rpc keyword then the name of the method then the parameter with the type that will accept “and we will define it later” and the type of the object that will return “also will define it later”.
· The types should be defined as a message for the objects and you can use enum keyword to define the enums types.
· The properties should be defined using the grpc datatypes for example int32 for integer and google.protobuf.Timestamp for timestamp and here you can find the list of supported types.
Step2 (Preparing the server side):
After creating the proto file now we can import the file to the server side by right-click on the project and then manage connected services then you will have a screen like below:
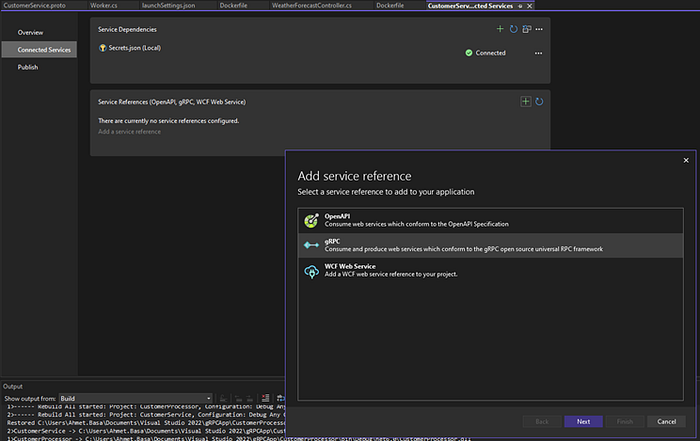
After selecting the gRPC type then you have to select the proto file that we created before and be careful to select the type of class to be generated for a server like below:
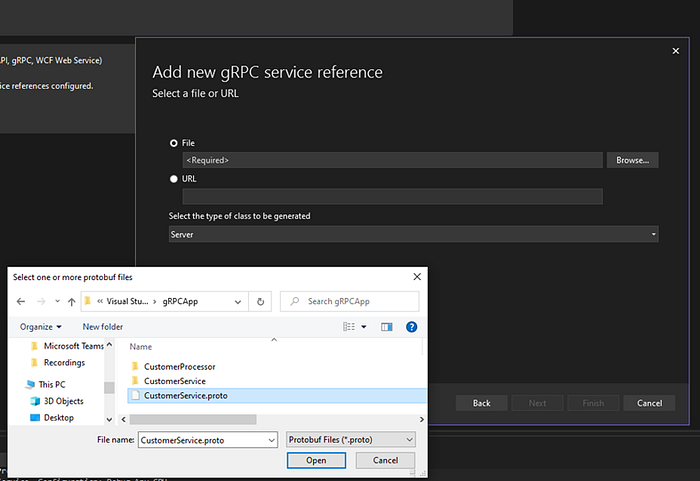
After that, you will find that there is a folder created in your project with the name Protos and inside it a proto file like the main file that we created before. By editing the project file, you will see that the reference is added with GrpcServices=”Server”.
After that, we will start using the file by creating a new class called GrpcCustomerSerivce and inside it, we will add the following code:
using CustomerService.gRPC;
using Grpc.Core;
using static CustomerService.gRPC.CustomerService;

namespace CustomerService.grpcServices
{
    public class GrpcCustomerSerivce: CustomerServiceBase
    {
        private ILogger<GrpcCustomerSerivce> _logger { get; }
        public GrpcCustomerSerivce(ILogger<GrpcCustomerSerivce> logger)
        {
            _logger = logger;
        }


        public override  Task<StatusResponse> AddCustomer(CustomerPacket request, ServerCallContext context)
        {
            try
            {
                foreach (var item in request.CustomerMsg)
                {
                    var customerMessage = new CustomerMessage { Id = item.Id, Name = item.Name, Address = item.Address };
                    //save to databse or processing it another way
                    _logger.LogInformation($"The message with the Id {customerMessage.Id} was successfully handeled");
                }

                return  Task.FromResult( new StatusResponse { Status = ReadStatus.Success, Message = "All the data handeled successfully." });
            }
            catch (Exception ex)
            {
                _logger.LogError(ex,"An exception happended when handeleing the data");
                return Task.FromResult( new StatusResponse { Status = ReadStatus.Failer, Message = "An exception happended when handeleing the data." });
            }
        }
    }
}
·Application will use Grpc.Core NuGet package.
·The class should be inherited from the base class that will be created automatically after adding the reference to the proto file and the name of the class is the name of the service followed by the Base word and in our example, it is CustomerServiceBase.
· We override the AddCusotmer method with the same return type and parameters and inside the method, we only read the incoming message and log it to the output but you can do whatever you want here as I mentioned before writing to a database or do another processing. In case of exception, I log the result and then return a message with a different status that informs the sender that a problem happened.
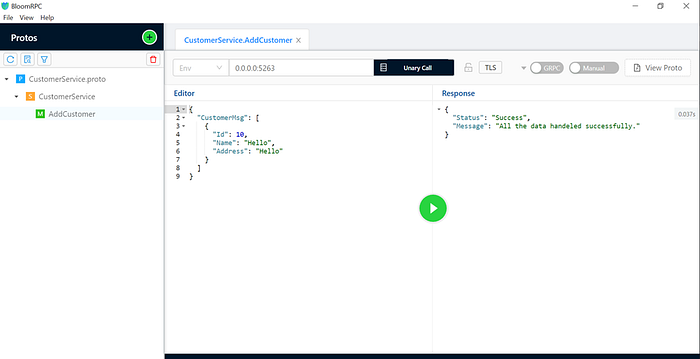
You can test the service by using an application called BloomRpc. After installing the app you can browse to the protobuf file and open it and you can see the functions and an autogenerated request data that you can send, up you can insert the address to the server and as a note, it needs to add the (Ip:port) of the server without the protocol especially if you are using it for localhost test.
Step3(Preparing the client side):
On the client side, we add the gRPC reference the same way that we did on the server side, but you have to choose the type of class to be generated for the client side. Inside the worker class, I added the code below:
using CustomerService.gRPC;
using Grpc.Net.Client;
using static CustomerService.gRPC.CustomerService;

namespace CustomerProcessor
{
    public class Worker : BackgroundService
    {
        private readonly ILogger<Worker> _logger;

        public Worker(ILogger<Worker> logger)
        {
            _logger = logger;
        }

        protected override async Task ExecuteAsync(CancellationToken stoppingToken)
        {
            _logger.LogInformation("Worker running at: {time}", DateTimeOffset.Now);

            while (!stoppingToken.IsCancellationRequested)
            {

                var channel = GrpcChannel.ForAddress("http://localhost:5264");
                var client = new CustomerServiceClient(channel);
                var customerPacket = new CustomerPacket();
                for (int i = 0; i < 10; i++)
                {
                    var customerMsg = new CustomerMessage { Name = $"Ahmet{i}", Id = i, Address = $"Address{i}" };
                    customerPacket.CustomerMsg.Add(customerMsg);
                }

                var result = client.AddCustomer(customerPacket);
                if (result.Status == ReadStatus.Success)
                {
                    _logger.LogInformation("Done! client send data to service", DateTimeOffset.Now);
                }
                else
                {
                    _logger.LogError("Error! client could not send data to service", DateTimeOffset.Now);

                }


                await Task.Delay(10000, stoppingToken);
            }
        }
    }
}
In the execution part of the worker, you can see the following:
We initialize the channel class with the URL to the server “you can put the url data inside the appsettings”
· We initialize the client to be used by passing the channel that we already build.
· We define the list of the objects to be sent and add them to the CustomerPacket.
· Finally we call the AddCustomer method and check the response from the server according to the status.
Step4(Testing the application):
In order to test the application, you can start the server and the client application and you will see the following result.
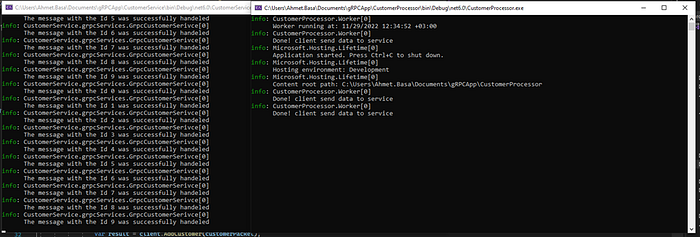
As you can see the left side is the server side and the right side is the client side. When the client sends a message to the service, the server will read the auto-generated message and write them to the console one by one. Then after the delay time will send it again.
The previous example is about a client that sent something to the service, but there are also different alternatives and you can find them in this link of the gRPC documentation.
- The client sends a single request to the server:
rpc SayHello(HelloRequest) returns (HelloResponse);- Server streaming RPCs where the client sends a request to the server and gets a stream to read a sequence of messages back
rpc LotsOfReplies(HelloRequest) returns (stream HelloResponse);- Client streaming RPCs where the client writes a sequence of messages and sends them to the server, again using a provided stream.
rpc LotsOfGreetings(stream HelloRequest) returns (HelloResponse);- Bidirectional streaming RPCs where both sides send a sequence of messages using a read-write stream.
rpc BidiHello(stream HelloRequest) returns (stream HelloResponse);Step5(Containerization of the server side):
In order to make the service work under a container first of all you have to create a dockerfile inside the service project like the one below:
FROM mcr.microsoft.com/dotnet/aspnet:6.0 AS base
WORKDIR /app
EXPOSE 5263
EXPOSE 80

FROM mcr.microsoft.com/dotnet/sdk:6.0 AS build

WORKDIR /src
COPY ./*.csproj ./
RUN dotnet restore
COPY . .
WORKDIR "/src"
RUN dotnet build -c Release -o /app/build

FROM build AS publish
RUN dotnet publish  -c Release -o /app/publish /p:UseAppHost=false

FROM base AS final
WORKDIR /app
COPY --from=publish /app/publish .
ENTRYPOINT ["dotnet", "CustomerService.dll"]
As you can see it is a typical one that first of all we specify the image to be downloaded then the ports to be exposed then copy the project files to the image then restore, build and publish the app.
After that under the sharedfiles I added the yml file for creating the environment and running it and inside the file, you can find the following:
version: '1.0'
services:
  ProductService:
   image: ${DOCKER_REGISTRY-}customerservice:v1
   build:
    context: ./CustomerService
    dockerfile: Dockerfile
   ports:
    - "5263:80"
Here we create the Customer service by executing the docker file content, you should execute the following commands in order to make it works:
docker-compose build
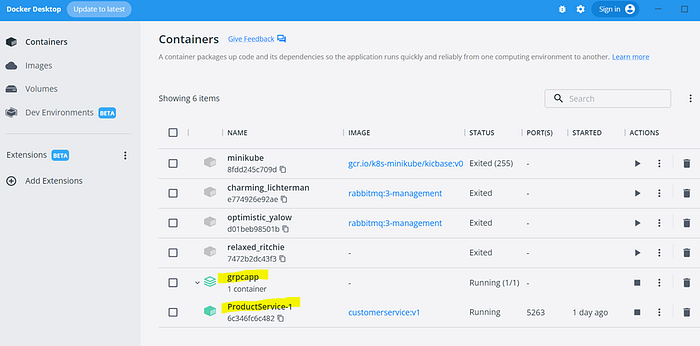
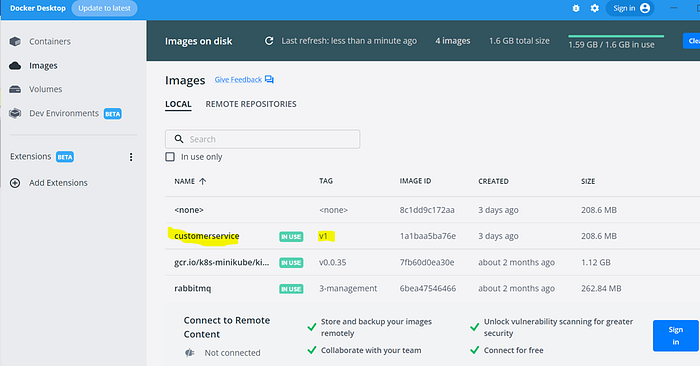
docker-compose upwhen you open the docker desktop app you can find the following image and container created:
Step6(Retesting after Containerization):
Now you can try to test the application using this url (0.0.0.0:5263) which is the port of the container inside the BloomRPC. And you can find that the application is working fine.
Conclusion:
In this article, we discussed the difference between the RPC and the Rest service also how to implement the application under the .net core 6 environment, and finally how to make the service work under a container. You can find the Git repository for this example here. Hope it was useful for you.